Adjusting Exposure in Adobe Camera Raw CS3
Written by IT News on 10:59 PMFor those digital photographers interested in the dark side, an old SLR loaded with a fine-grain black and white film is a hard act to follow. The liquid smooth transitions and black velvet-like quality of dark low-key prints of yesteryear is something that digital capture is hard pressed to match.
The sad reality of digital capture is that underexposure in low light produces an abundance of noise and banding (steps rather than smooth transitions of tone). The answer, however, is surprisingly simple for those who have access to a DSLR and have selected the Raw format from the Quality menu settings in their camera. Simply be generous with your exposure to the point of clipping or overexposing your highlights and only attempt to lower the exposure of the shadows in Adobe Camera Raw.

STEP 1
The first step is the most difficult to master for those who are used to using Auto or Program camera exposure modes. Although the final outcome may require deep shadow tones, the aim in digital low-key camera exposure is to first get the shadow tones away from the left-hand wall of the histogram by increasing and NOT decreasing the exposure. It is vitally important, however, not to increase the exposure so far that you lose or clip highlight detail.
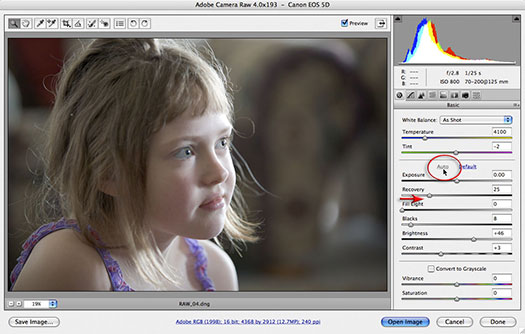
The original exposure of the image used in this project reveals that the shadow tones (visible as the highest peaks in the histogram) have had a generous exposure in-camera so that noise and banding have been avoided (the tones have moved well to the right in the histogram). The highlights, however, look as though they have become clipped or overexposed. The feedback from the histogram on the camera's LCD would have confirmed the clipping at the time of exposure (the tall peak on the extreme right-hand side of the histogram) and if you had your camera set to warn you of overexposure, the highlights would have been merrily flashing at you to ridicule you of your sad attempts to expose this image.
The typical DSLR camera is, however, a pessimist when it comes to clipped highlights and ignorant of what is possible in Adobe Camera Raw. Adobe Camera Raw can recover at least one stop of extra highlight information when the Exposure slider is dragged to the left (so long as the photographer has used a DSLR camera that has a broader dynamic range than your typical fixed lens compact digicam).
'Exposing right'
When the Auto checkbox in the Exposure slider is checked, Adobe Camera Raw often attempts to rescue overexposed highlights automatically. With a little knowledge and some attention to the camera's histogram during the capture stage, you can master the art of pushing your highlights to the edge.
So if your model is not in a hurry (mine is watching a half-hour TV show) you can take an initial exposure on Auto and then check your camera for overexposure. Increase the exposure using the exposure compensation dial on the camera until you see the flashing highlights. When the flashing highlights start to appear you can still add around one extra stop to the exposure before the highlights can no longer be recovered in Adobe Camera Raw. The popular term for this peculiar behavior is called 'exposing right'.
Performance Tip
If the highlights are merrily flashing and the shadows are still banked up against the left-hand wall of the histogram, the solution is to increase the amount of fill light, i.e. reduce the difference in brightness between the main light source and the fill light. If you are using flash as the source of your fill light, it would be important to drop the power of the flash by at least two stops and choose the 'Slow-Sync' setting (a camera flash setting that balances both the ambient light exposure and flash exposure) so that the flash light does not overpower the main light source positioned behind your subject. The harsh light from the on-camera flash can also be diffused using a diffusion device.
STEP 2
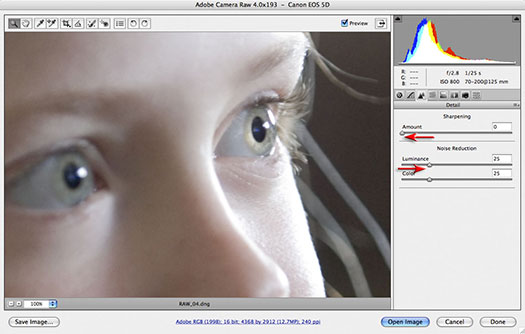
Before we massage the tones to create our low-key image we must first check that our tones are smooth and free from color and luminance noise. Zoom in to 100% magnification for an accurate preview and look for any problems in the smooth dark-toned areas. Setting both the Luminance Smoothing and Color Noise Reduction sliders to 25 (found in the Detail tab) removes the noise in this image. I would also recommend that the Sharpness slider be set to 0 at this point. Rather than committing to global sharpening using the Adobe Camera Raw dialog box, selective sharpening in the main Photoshop editing space may help to keep the tones as smooth as possible.
STEP 3
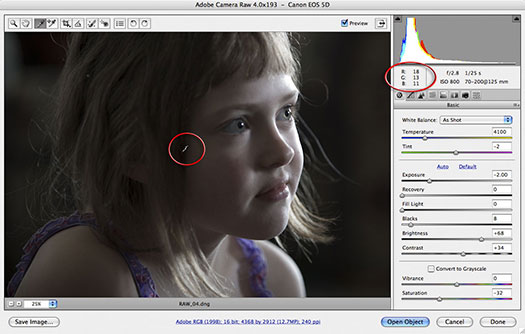
Create the low-key look by moving the Exposure and/or the Brightness sliders to the left in the Basic tab. You can continue to drop these sliders until the highlights start to move away from the right-hand wall of the histogram. Select the 'White Balance Tool' and move your mouse cursor over the deeper shadows – this will give you an idea of the RGB values you are likely to get when this image is opened into the editing space. Once you approach an average of 15 to 20 in all three channels the low-key look should have been achieved.
 | Posted in »


0 comments: Responses to “ Adjusting Exposure in Adobe Camera Raw CS3 ”