Sharing Excel files safely
Written by IT News on 10:20 PMSharing an Excel documents is easy. Probably a lot of people don't realize it, but Microsoft built Office 2003 and Office 2007 with collaboration in mind. Both versions allow you to share an Excel workbook with other users so multiple users can make modifications to a spreadsheet. In this article, will show you how to share an Excel 2007 workbook. More importantly, It will discuss how you can keep a shared workbook secure.
Before you start sharing a workbook, the first thing you have to do is protect the spreadsheet you've created. It is very important to lock the cells so that other users are not able to modify them without your permission.
You can protect a range of cells by selecting them, right clicking on them and selecting the Format Cells command from the resulting shortcut menu. When you do, Windows will display the Custom Lists properties sheet. Go to the Protection tab and either lock or unlock the protected cells. Keep in mind that locking a cell has no effect until you protect the sheet.

To protect a worksheet, click on the Review menu and then click the Protect Sheet icon. When you do, Windows will display the Protect Sheet dialog box.
Verify that the Protect Worksheet and Contents of Locked Cells check box is selected. Then enter a password to use in order to unprotect the sheet. Keep in mind that this password is worksheet specific.
Before you click OK, read through the other protection options on this dialog box. You can control what users will and will not be allowed to do to the spreadsheet just by selecting a check box. By default, users are allowed to select both locked and unlocked cells in a protected spreadsheet, but that's about it. It is up to you to decide whether you want to allow your users to format or create or delete cells, rows or columns. You can also authorize or forbid various other types of edits.
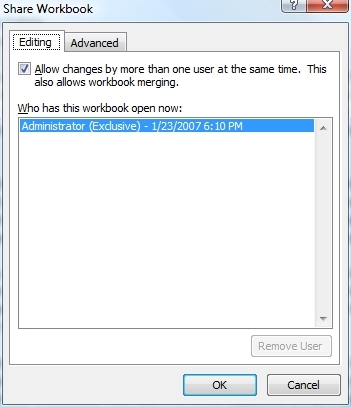
Now that you have implemented some basic protection, it's time to share the workbook. To do so, go to Excel's Review menu and click the Share Workbook icon. Excel will display the Share Workbook dialog box. To share the workbook, select the Allow Changes by More Than One User at a Time check box, found on the Editing tab, as shown in Figure A.

To share the workbook, select the Allow Changes by More Than One User at a Time check box.
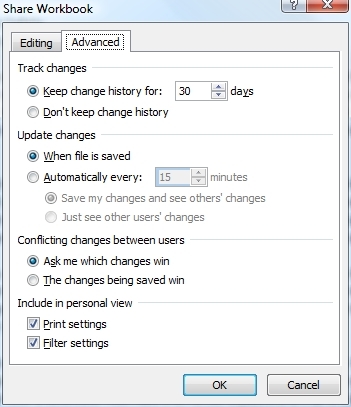
Before you click the OK key, go to the Advanced tab, shown in Figure B. As you can see in the figure, the Advanced tab asks you if you want to track changes to the file. If security is a concern to you, then I highly recommend tracking changes to the file. By doing so, you create an audit trail that allows you to see exactly what modifications were made by whom.

Figure B
The Advanced tab contains settings related to tracking document changes.
The next section is the Update Changes section. By default, updates occur when the file is saved, but you can configure changes to be updated on a periodic basis.
The fact that multiple users can work on the document simultaneously means that there is a potential for conflicts to occur. Two users could potentially save contradictory changes at the same time. As such, Excel makes you decide what should happen when contradictory changes occur. By default, Excel will ask you which change should be kept, but you have the option of configuring Excel so that the most recently saved change is authoritative. From a security perspective, I recommend going with the default setting because then you can decide for yourself which change to keep and which to discard.
The last section shown in Figure B is the Include in Personal View section. By default, each user is allowed to maintain his own separate printer settings and filtered view settings. This isn't usually a threat to security since a user cannot change another user's print settings or filter settings. Therefore, I recommend going with the default settings in this section.
Click OK, and the worksheet will be shared. Keep in mind, though, that you have only granted document-level sharing. It is still up to you to place the shared worksheet into a network location where it will be accessible to all of the necessary users. I strongly recommend setting some NTFS permissions so that only the intended users are allowed to access the document.
 | Posted in »


0 comments: Responses to “ Sharing Excel files safely ”